Tuya Universal IR Remote

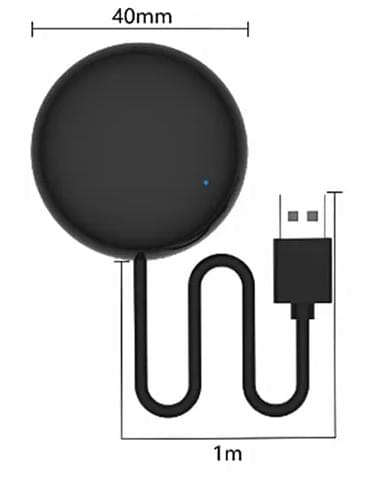
Adding to the ever-growing list of IoT devices in my home, I recently purchased a Tuya Universal IR Remote. This device is a small IR blaster that can be controlled via the Tuya Smart Life app. It can be used to control a wide range of IR devices such as TVs, air conditioners, and more. The device is powered by a BK7231N chip, which can be flashed with OpenBeken firmware to enable local control and integration with Home Assistant.

Flashing OpenBeken Firmware

I forgot to get photos of the process, but the process was pretty simple. Using my Tigard FTDI adapter and a BDM frame, I probed the +3.3v, GND, RX, TX and BOOT pins on the device. I then used the ltchiptool to read the current firmware from the device, and then flashed the OpenBeken firmware to the device.

1
2
3
4
5
6
7
8
# Read the current firmware from the device. Multiple times to ensure a good read.
ltchiptool flash read -d /dev/cu.usbserial-TG10005e0 -b 921600 BK7231N universal-ir-remote-a.bin
ltchiptool flash read -d /dev/cu.usbserial-TG10005e0 -b 921600 BK7231N universal-ir-remote-b.bin
ltchiptool flash read -d /dev/cu.usbserial-TG10005e0 -b 921600 BK7231N universal-ir-remote-c.bin
# md5sum the files to ensure they are the same
md5sum universal-ir-remote-*.bin
# Flash the OpenBeken firmware to the device
ltchiptool flash write -d /dev/cu.usbserial-TG10005e0 -b 921600 firmware/OpenBK7231N_QIO_1.17.474.bin

Configuring OpenBeken

  • Set up the Wifi credentials
  • Set up MQTT

Configure module pins:

1
2
3
4
5
6
7
8
{
"pins": {
"6": "dInput;1",
"7": "IRRecv;0",
"8": "WifiLED_n;2",
"26": "IRSend;0"
}
}

Reading IR

Reading signals from the IR remote control is pretty simple. Just point the remote at the IR receiver and press a button. The signal will be printed in the OpenBeken log output. Now would be a good time to sniff the IR codes from the remote you plan on using.

example:

1
2
3
4
5
6
7
Info:IR:IR IR_NEC 0x38 0x54 1 (0 bits)
Info:IR:IR IR_NEC 0x38 0x1E 0 (32 bits)
Info:IR:IR IR_NEC 0x38 0x1E 1 (0 bits)
Info:IR:IR IR_NEC 0x38 0x1E 0 (32 bits)
Info:IR:IR IR_NEC 0x38 0x1E 1 (0 bits)
Info:IR:IR IR_NEC 0x38 0x4F 0 (32 bits)

Sending IR

This can be done several ways…

Via HTTP

Using the cm command in the URL, you can directly ask the module to send an IR signal.

1
http://192.168.1.162/cm?cmnd=IRsend+NEC-0x38-0x18

Via MQTT

OpenBeken supports sending commands via MQTT. This is the preferred method IMO, as I don’t need to assign a static IP to the device.

1
2
Topic: `cmnd/obk50BC34A0/IRsend`
Payload: `NEC-0x38-0x18` (mute)

Automation

I went the route of building a Node-RED Dashboard to control the device. Initially I set up a button per IR code, but this quickly became a hassle to manage, so when it came to building a fully exhaustive remove, I rewrote everything into a UI Template node, which iterates over a JS Object, describing the remote control buttons. To simplfiy the buttons and template, I created a JS function to map the button to the IR code. This wasn’t necessary, but it made the template much cleaner, and I can choose to omit buttons from a remote if I don’t use them without losing the IR code.

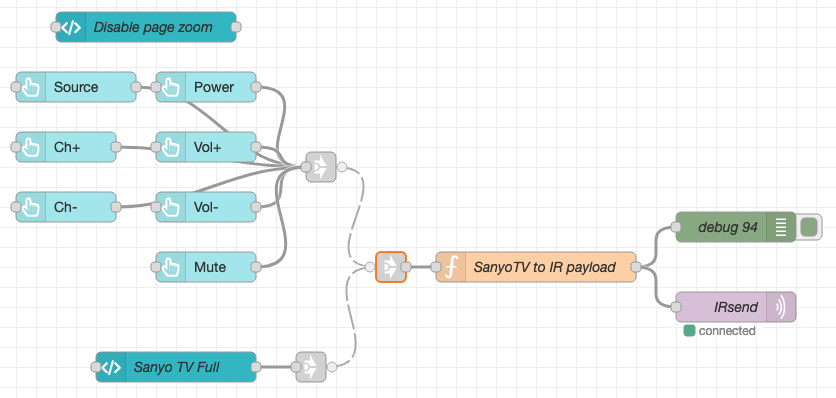
Function: “SanyoTV to IR payload”

1
2
3
4
5
6
7
8
9
10
11
12
13
14
15
16
17
18
19
20
21
22
23
24
25
26
27
28
29
30
31
32
33
34
35
36
37
38
39
40
41
42
// Map key press to IR code
const sanyoTv = {
source: "0x13",
power: "0x12",
eco: "0x59",
audio: "0x1A",
onTimer: "0x52",
caption: "0x11",
reset: "0x1C",
sleep: "0x0D",
num1: "0x01",
num2: "0x02",
num3: "0x03",
num4: "0x04",
num5: "0x05",
num6: "0x06",
num7: "0x07",
num8: "0x08",
num9: "0x09",
chanUp: "0x0A",
num0: "0x00",
volUp: "0x0E",
chanDn: "0x0B",
volDn: "0x0F",
recall: "0x19",
subChan: "0x4B",
mute: "0x18",
info: "0x0C",
pixShape: "0x57",
dynVol: "0x1D",
menu: "0x17",
help: "0x31",
up: "0x4E",
left: "0x1F",
enter: "0x54",
right: "0x1E",
down: "0x4F",
exit: "0x53",
};
const value = sanyoTv[msg.payload];
msg.payload = `NEC-0x38-${value} 1`;
return msg;

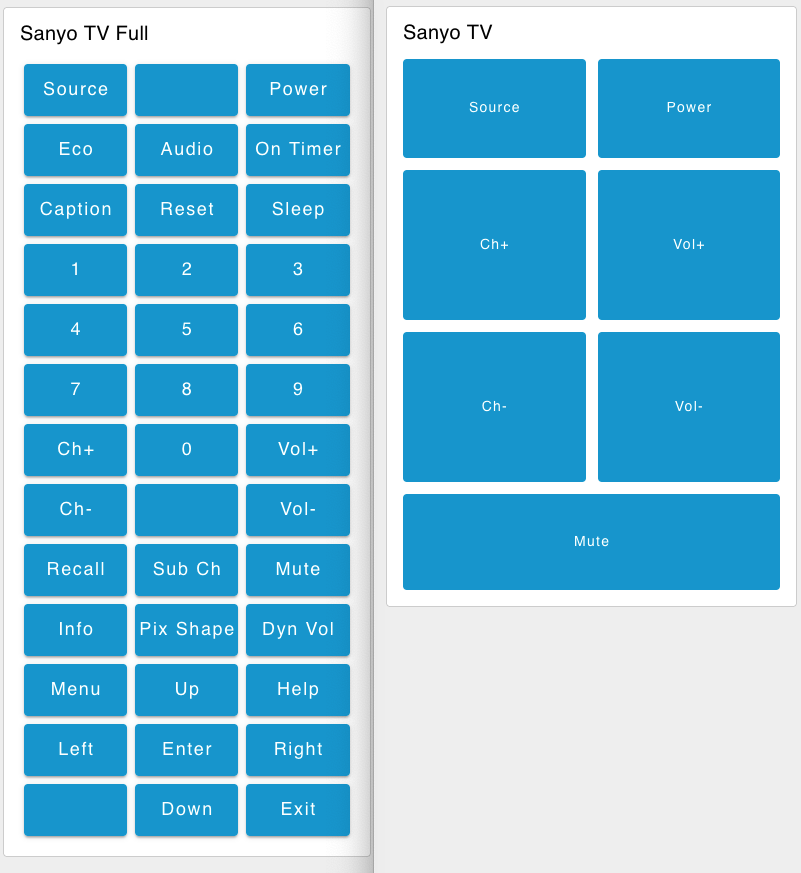
Template node: “Sanyo TV Full”

1
2
3
4
5
6
7
8
9
10
11
12
13
14
15
16
17
18
19
20
21
22
23
24
25
26
27
28
29
30
31
32
33
34
35
36
37
38
39
40
41
42
43
44
45
46
47
48
49
50
51
52
53
54
55
56
57
58
59
60
61
62
63
64
65
66
67
68
<template>
<v-row no-gutters>
<v-col v-for="item in buttonObj" cols="4">
<v-sheet class="pa-1">
<v-btn block size="x-large" @click="pressed({item})">{{item.label}}</v-btn>
</v-sheet>
</v-col>
</v-row>
</template>

<script>
export default {
data() {
// define variables available component-wide
// (in <template> and component functions)
return {
count: 0,
buttonObj: [
{ key: 'source', label: 'Source' },
{},
{ key: 'power', label: 'Power' },
{ key: 'eco', label: 'Eco' },
{ key: 'audio', label: 'Audio' },
{ key: 'onTimer', label: 'On Timer' },
{ key: 'caption', label: 'Caption' },
{ key: 'reset', label: 'Reset' },
{ key: 'sleep', label: 'Sleep' },
{ key: 'num1', label: '1' },
{ key: 'num2', label: '2' },
{ key: 'num3', label: '3' },
{ key: 'num4', label: '4' },
{ key: 'num5', label: '5' },
{ key: 'num6', label: '6' },
{ key: 'num7', label: '7' },
{ key: 'num8', label: '8' },
{ key: 'num9', label: '9' },
{ key: 'chanUp', label: 'Ch+' },
{ key: 'num0', label: '0' },
{ key: 'volUp', label: 'Vol+' },
{ key: 'chanDn', label: 'Ch-' },
{},
{ key: 'volDn', label: 'Vol-' },
{ key: 'recall', label: 'Recall' },
{ key: 'subChan', label: 'Sub Ch' },
{ key: 'mute', label: 'Mute' },
{ key: 'info', label: 'Info' },
{ key: 'pixShape', label: 'Pix Shape' },
{ key: 'dynVol', label: 'Dyn Vol' },
{ key: 'menu', label: 'Menu' },
{ key: 'up', label: 'Up' },
{ key: 'help', label: 'Help' },
{ key: 'left', label: 'Left' },
{ key: 'enter', label: 'Enter' },
{ key: 'right', label: 'Right' },
{},
{ key: 'down', label: 'Down' },
{ key: 'exit', label: 'Exit' },
]
}
},
methods: {
// expose a method to our <template> and Vue Application
pressed: function (val) {
this.send({ payload: val.item.key })
},
},
}
</script>

Results

Ref: