In a prior post , I had accidentally purchased a Zigbee smart switch instead of a WiFi smart switch. I had no Zigbee hub at that moment, so it went into the drawer. In watching a lot of YouTube videos, I repeatedly heard about a project called Zigbee2MQTT. This project acts as a proxy between a USB Zigbee dongle and MQTT, allowing you to control Zigbee devices with MQTT messages. Since most of my devices are already using MQTT, this seemed like a good fit for my home automation setup.
Hardware
I purchased a Sonoff Zigbee 3.0 USB dongle E from AliExpress for $18. This dongle is based on the EFR32MG21 chip, and was pre-flashed with Z-Stack 3.x.0 coordinator firmware. The AliExpress page even mentioned that it was compatible with Zigbee2MQTT, which was a good sign. I have it plugged directly into my Odroid C2, generally in the middle of my home.
While I was waiting for the dongle to arrive, I also purchased various other inexpensive Zigbee devices for sale on AliExpress.
- 2x Smart button “scene” switches
- 2x Mini smart PIR motion sensors
- 2x Door and window sensors
- 2x Leak sensors
I also found a couple of Zigbee switches at IKEA.
Software
I followed the Zigbee2MQTT documentation to install the software on my Odroid C2. Fortunately, the instructions recommended installing using Docker Compose, which also happens to be my preferred method. I created a docker-compose.yml file with the following contents:
1 | version: "3.7" |
Configuration and usage
Once the container was running, I was able to access the Zigbee2MQTT web interface at http://[odroid-ip]:8081, and was able to pair all of the Zigbee devices with the Sonoff Zigbee 3.0 USB dongle, and control/monitor them from the web interface. Now that everything is paired and happily working with MQTT, I can jump over to Node-RED and set up some automations.
So far, I just have a basic light switch set up to toggle my detached garage lights on and off from my kitchen. This has been very useful when it’s dark or raining and I don’t want to fuss with the light switch when entering/exiting the garage.
Even though Zigbee2MQTT uses basic MQTT topics, I found it easier to use the node-red-contrib-zigbee2mqtt package to interact with Zigbee2MQTT. This package provides a bit more of a user-friendly interface to the Zigbee2MQTT topics. It also bubbles up signal strength and battery level, which is nice to have.
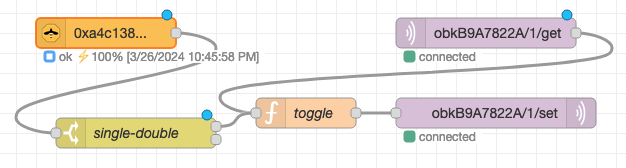
Node-RED flow
I could have made this a bit more simple, but I wanted to have the button work as a toggle, regardless of the current state of the light. In order to do this, I have to monitor the MQTT “get” topic of my light switch and record it in Node-RED, and use it to drive the inverse state when the button is pressed. Additionally, this button offers single or double presses, so I have a simple switch node in the flow to only act on single presses.
Function node code:
1 | // Read prior state (false if unknown) |