Flash Etekcity Plugs (ESW01) with ESPHome

I’ve been slowly amassing a collection of various smart plugs and switches around my house for the purpose of setting up a home automation system. I picked up a single Etekcity ESW01 plug to test out, and was pleasantly surprised to find that it was based on the ESP8266, a very popular and well supported microcontroller. I hadn’t played with home automation in a while, and was excited to see how far it had come. Where previously, I would have had to roll my own firmware, and then write my own integration for Home Assistant, I found that there is now a project called ESPHome which allows you to easily flash ESP8266 and ESP32 devices with a custom firmware, and then integrate them into Home Assistant.

Disassembly

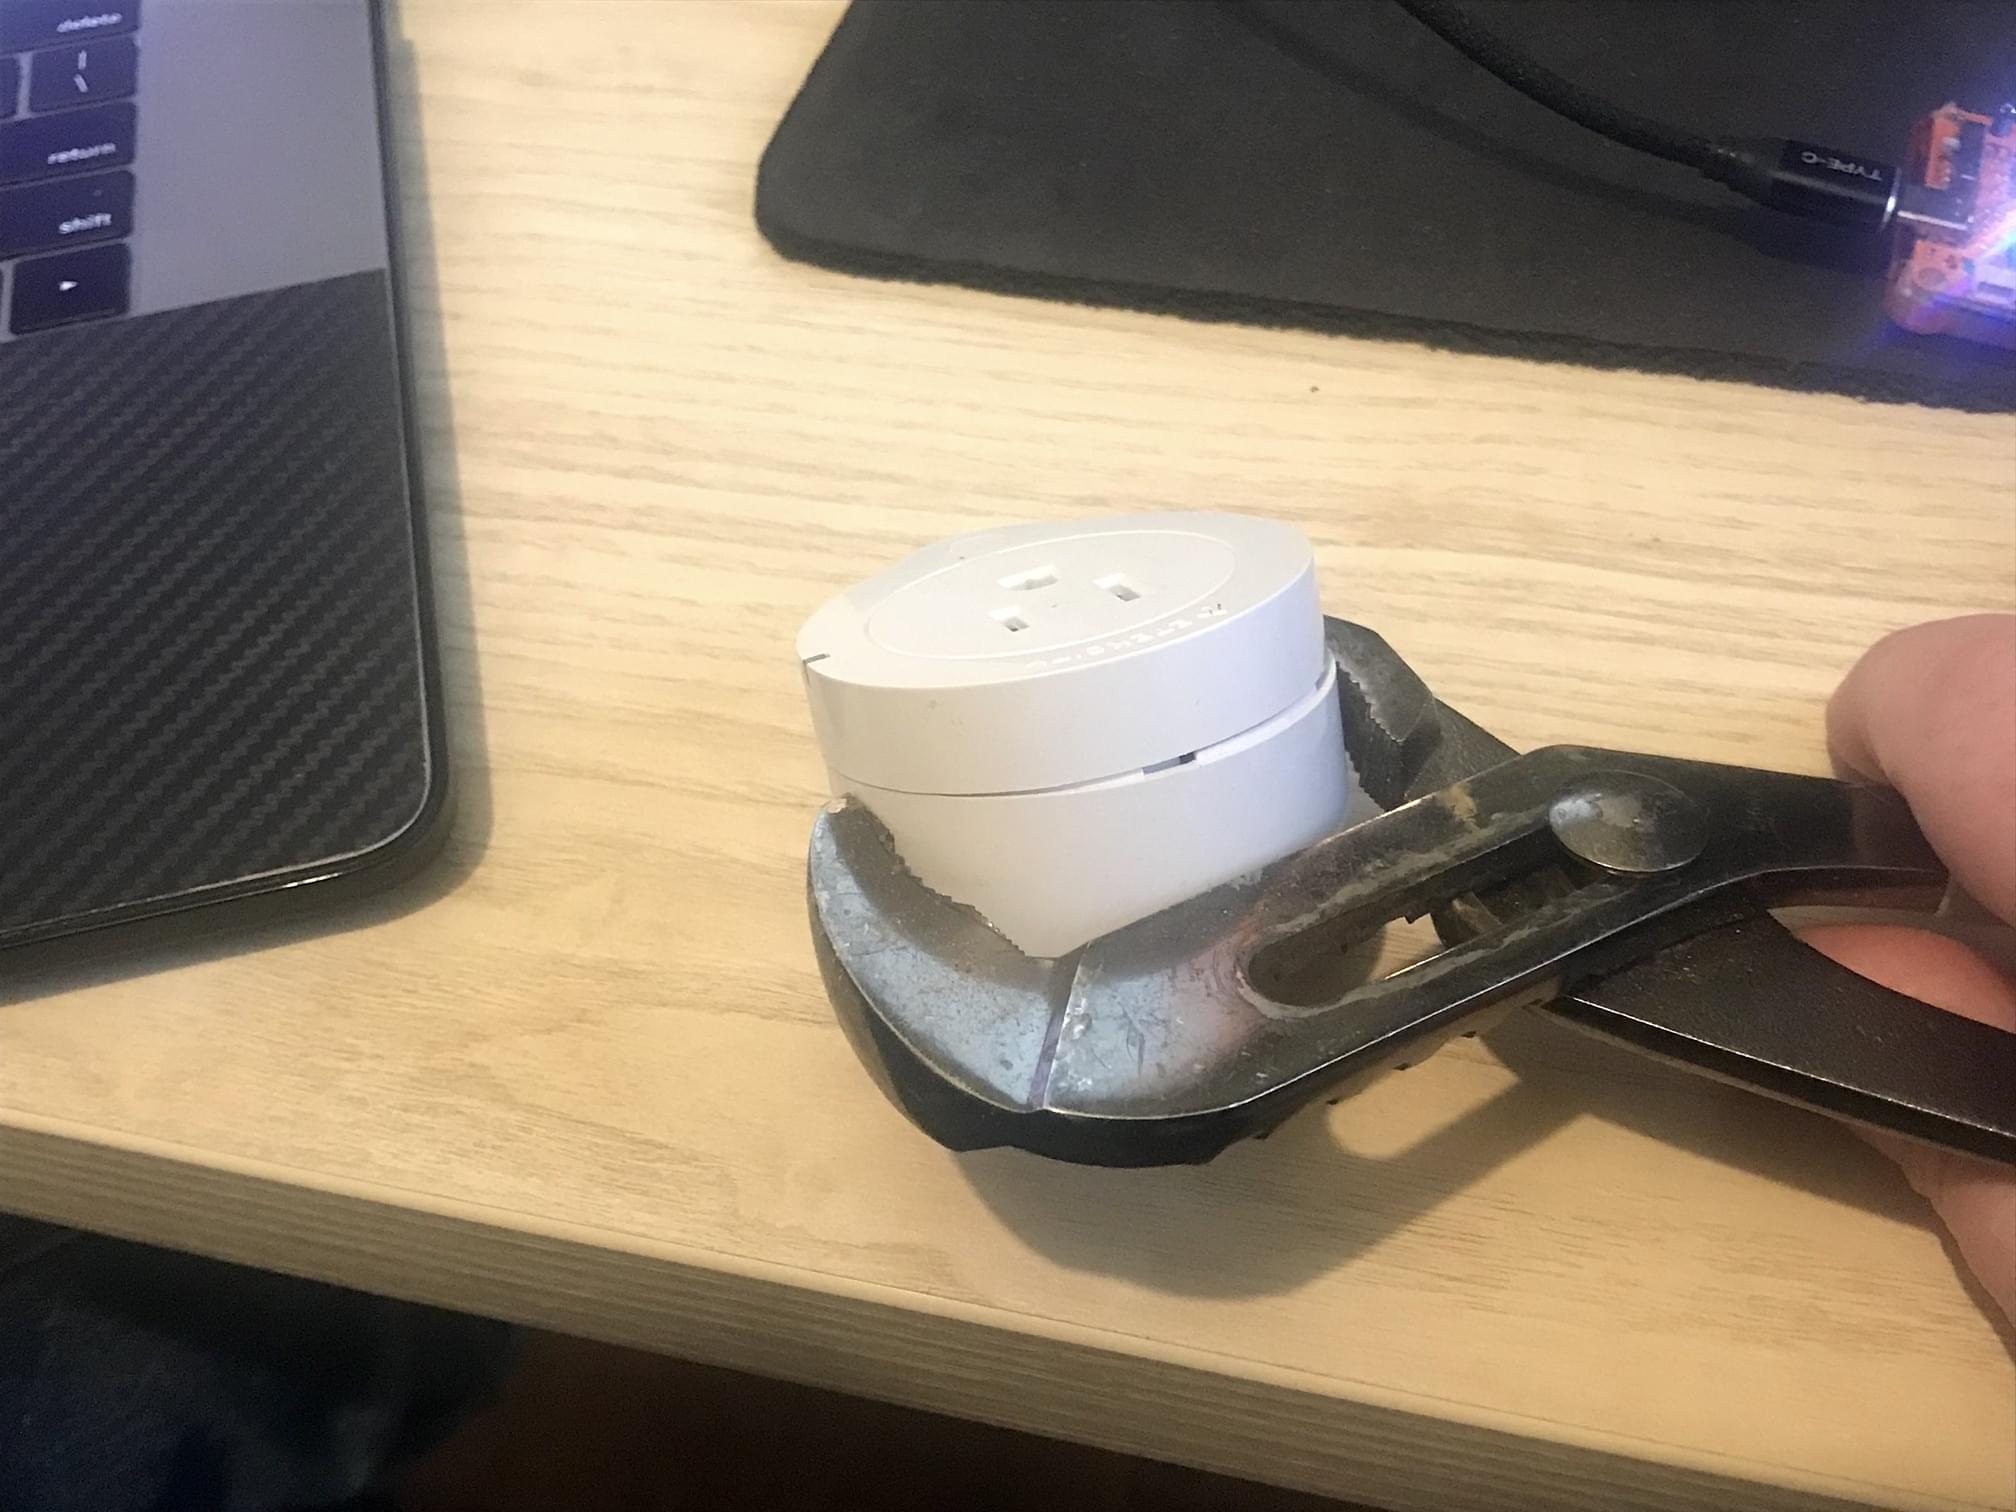
I couldn’t locate any ways to flash the device without opening it up, so I had to take it apart. The two halfs of the device are held together with a few internal clips. I had tried to slide a spudger and an iFixit Jimmy around the crease, but was unable to get it to open. I ended up having to grip one half with a pair of pliers, and apply enough pressure to unclip a few of the clips to get started, and then was able to use the Jimmy to unclip the rest.

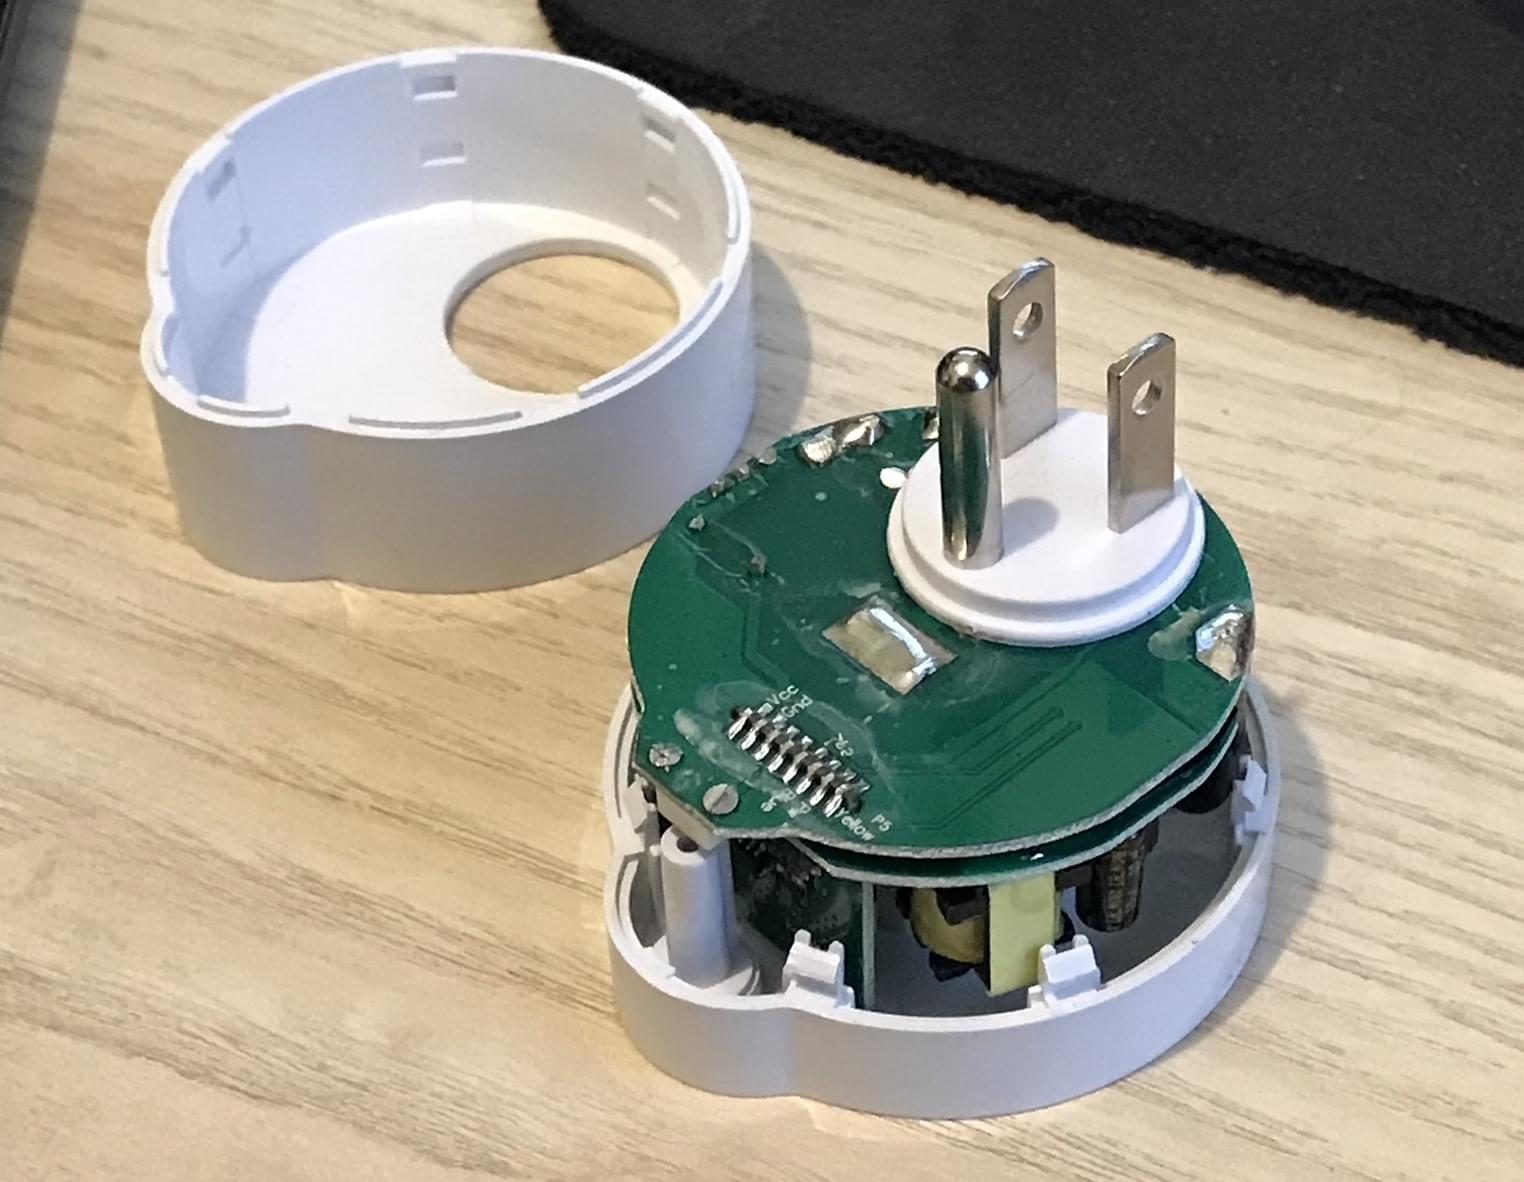
Once open, the device is very simple. There are a few PCBs, likely one for high-voltage, one for low-voltage, and one for the ESP8266 ESP-12F.

Flashing

It’s usually recommended to flash the device in a totally powered down state, but I was having issues with power sinking through the rest of the board, so I ended up flashing it in a powered on state. This is NOT recommended, and you should do so at your own risk. To conduct the flashing, I used my Tigard, an FTDI FT2232H-based multi-protocol tool for hardware hacking. I only conneected the TX, RX, and GND pins, as I didn’t need to power the device from the Tigard. For additional isolation, I ran my laptop off of battery power. I also soldered to the GPIO0 pin on the ESP-12F, and briefly connected it to GND to put the device into flash mode.

Photo from SmartThings Community blog

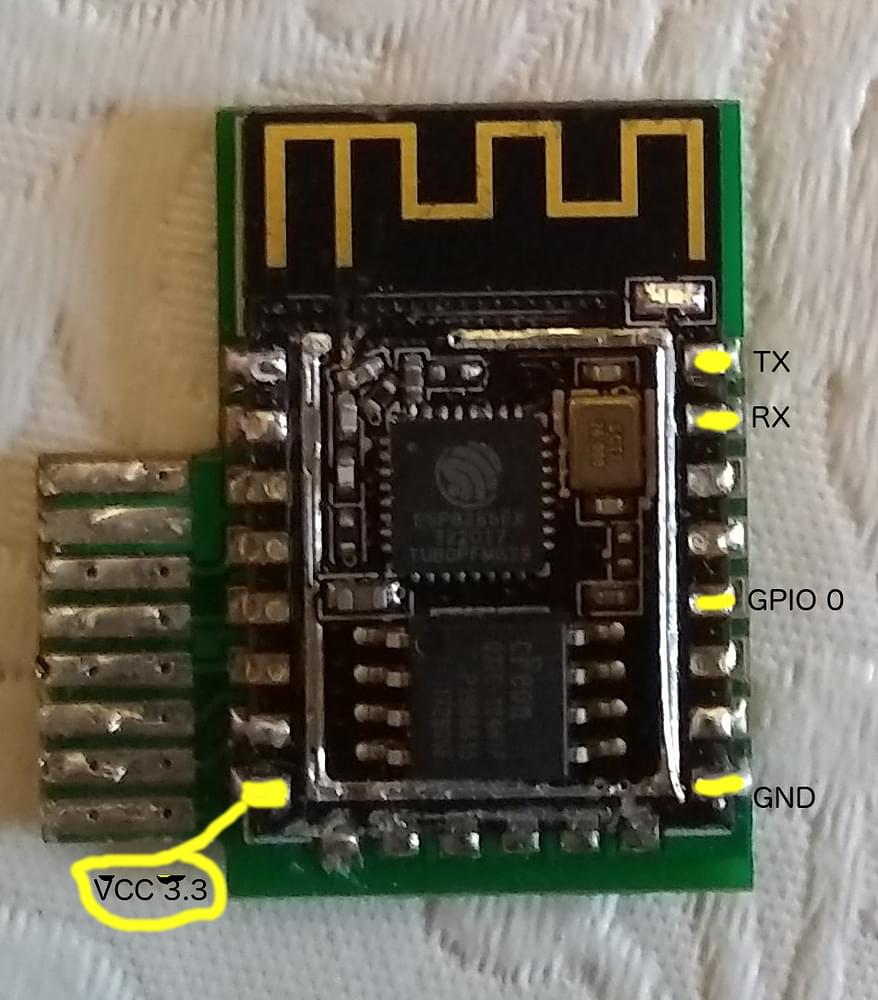
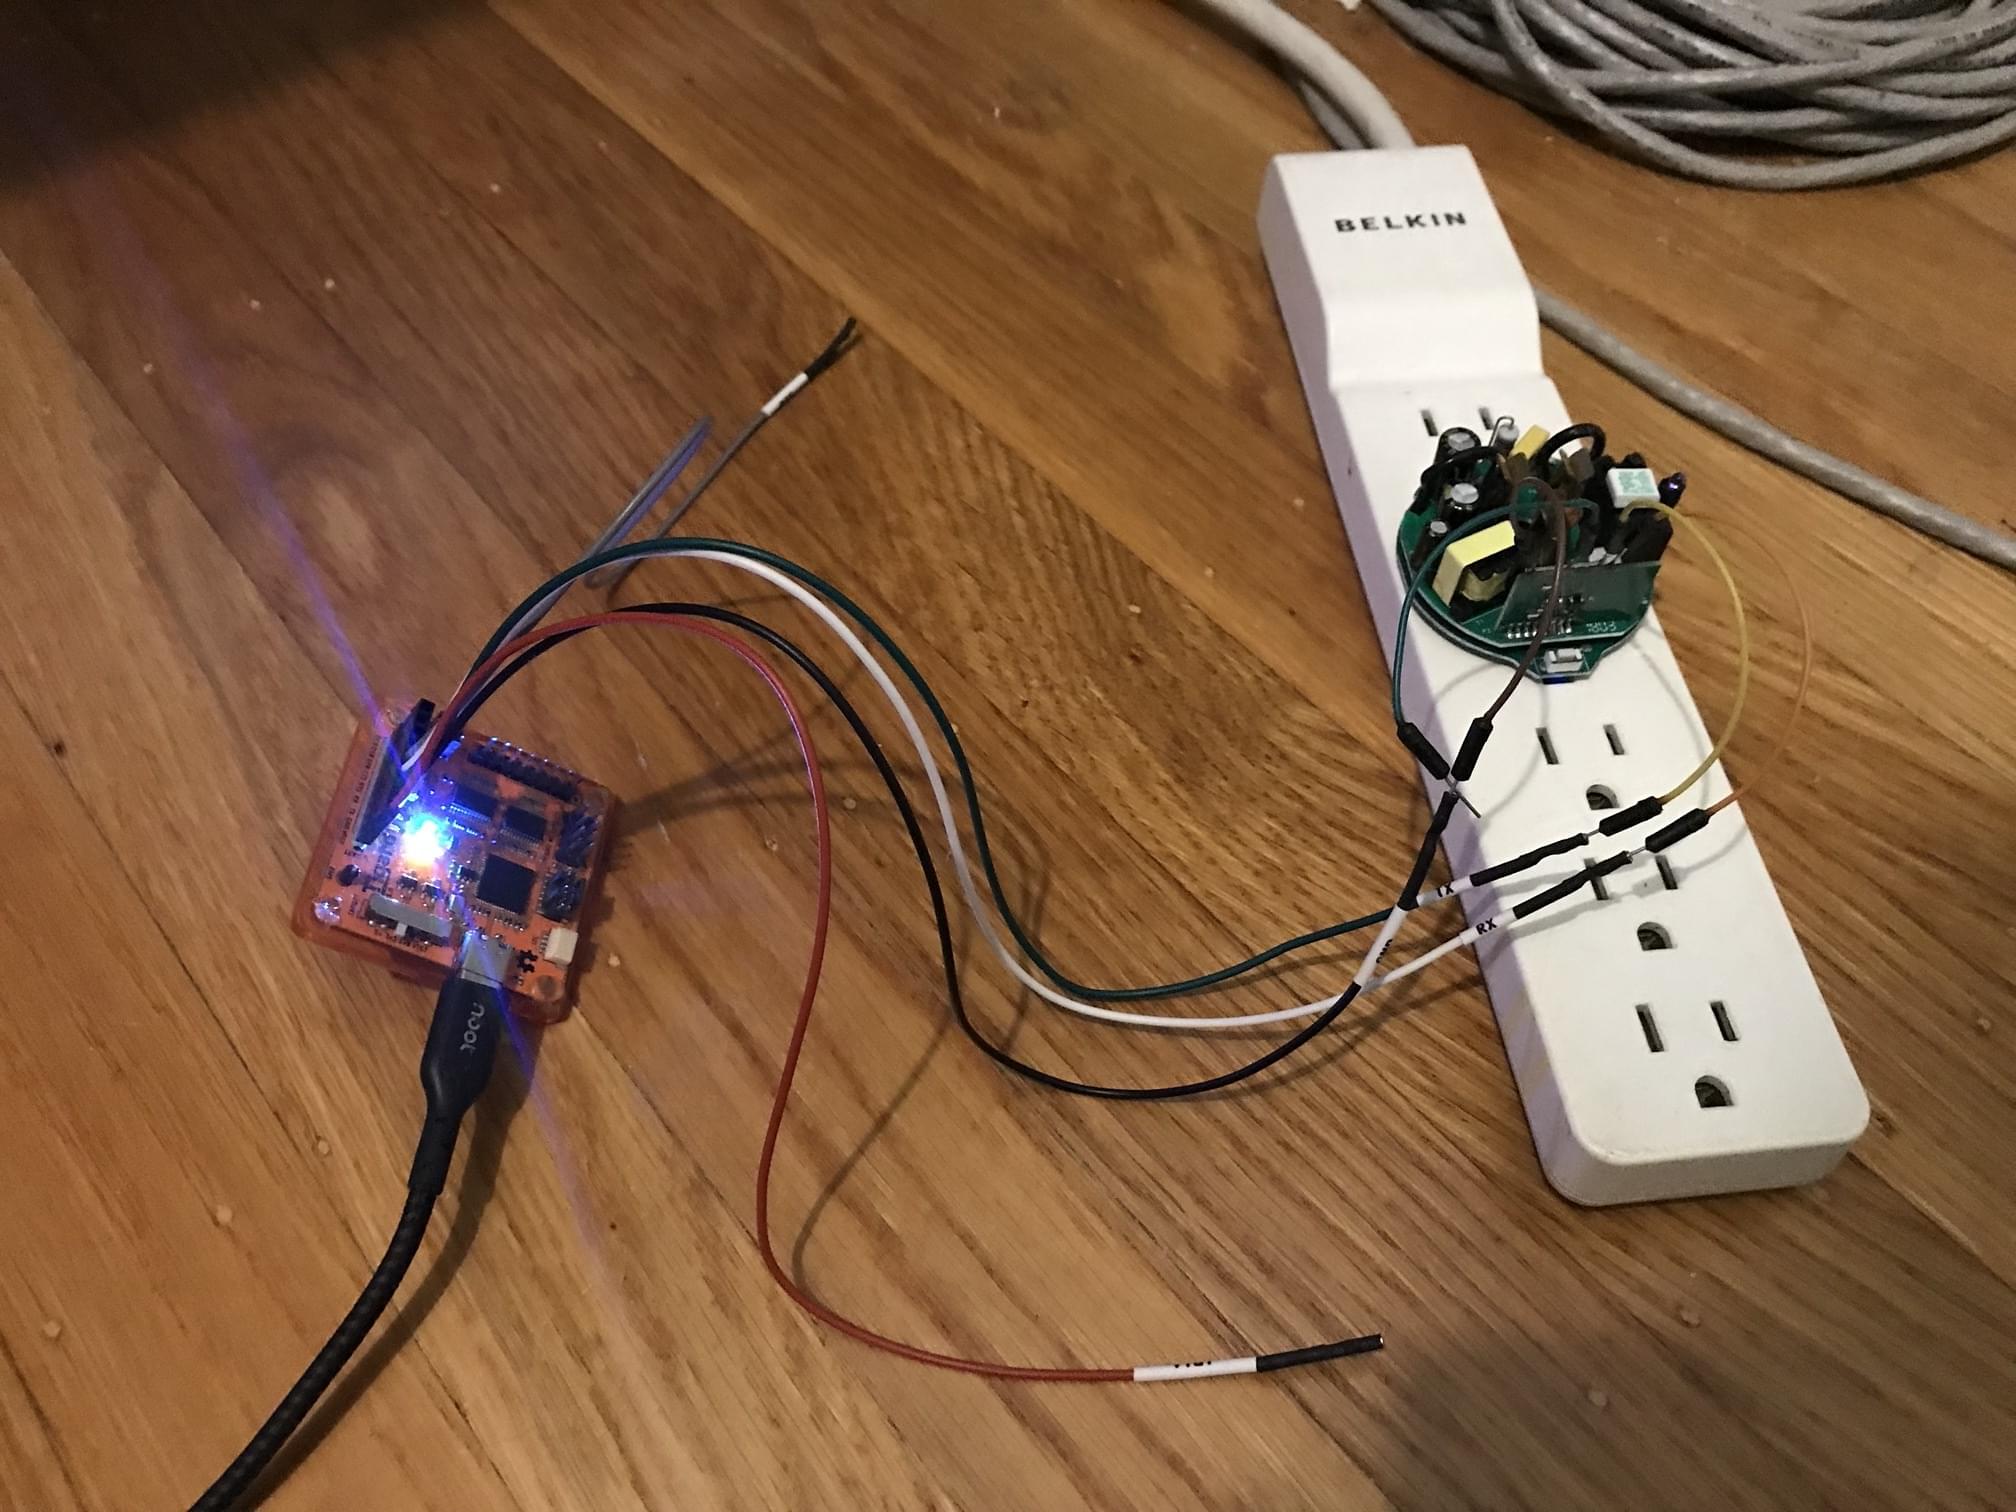
The wiring was as follows, which was conviently all on the same edge of the ESP-12F:

TigardESP-12F
TXRX
RXTX
GNDGND
GND (briefly)GPIO0

Once connected, I used esptool to dump the firmware, and then flashed the ESPHome firmware using the ESPHome web-based flasher I had running in a local Docker container.

1
2
3
4
5
6
7
8
9
10
11
12
13
14
15
16
# docker-compose.yml
version: '3'

services:
esphome:
# http://0.0.0.0:6052/
container_name: esphome
image: ghcr.io/esphome/esphome
volumes:
- ./config:/config
- /etc/localtime:/etc/localtime:ro
restart: always
privileged: true
network_mode: host
environment:
- ESPHOME_DASHBOARD_USE_PING=true

Once flashed, I was able to connect to the device over WiFi, and configure it using the ESPHome web interface.

Configuration

GPIO Pinout:

PinFunction
GPIO4Relay
GPIO5LED blue
GPIO12HLWBL CF1 Pin
GPIO13HLW8012 CF Pin
GPIO14Button
GPIO16LED yellow

Initially, I set up a basic switch/relay/light YAML config, based on my own probing around, but after doing some research on this Etekcity plug, I had discovered it has power monitoring capabilities. Rather than reinvent the wheel, I found a blog post (which I can’t seem to locate now), which took GPIO12 and GPIO13, and used them to monitor the power usage of anything plugged in.

I applied the following yaml configuration to the device:

1
2
3
4
5
6
7
8
9
10
11
12
13
14
15
16
17
18
19
20
21
22
23
24
25
26
27
28
29
30
31
32
33
34
35
36
37
38
39
40
41
42
43
44
45
46
47
48
49
50
51
52
53
54
55
56
57
58
59
60
61
62
63
64
65
66
67
68
69
70
71
72
73
74
75
76
77
78
79
80
81
82
83
84
85
86
87
88
89
90
91
92
93
94
95
96
97
98
99
100
101
102
103
104
105
106
107
108
109
110
111
112
113
114
115
116
117
118
119
120
121
122
123
124
125
126
127
128
129
130
131
132
133
134
135
136
137
138
139
140
141
142
143
144
145
146
147
148
149
150
151
152
153
154
155
156
157
158
159
160
161
esphome:
name: "etekcity-plug-123456"
# friendly_name: "etekcity-plug-123456"

esp8266:
board: esp01_1m

# Enable logging
logger:

# Enable Home Assistant API
api:
encryption:
key: "THIS_IS_NOT_FOR_PUBLIC_EYES"

ota:
password: "THIS_IS_NOT_FOR_PUBLIC_EYES"

wifi:
ssid: !secret wifi_ssid
password: !secret wifi_password
# Enable fallback hotspot (captive portal) in case wifi connection fails
ap:
ssid: "ESPHome Fallback Hotspot"
password: "THIS_IS_NOT_FOR_PUBLIC_EYES"

captive_portal:
# no configuration needed

status_led:
pin:
number: GPIO5

output:
- platform: gpio
id: led1
pin: GPIO16

switch:
- platform: gpio
name: "Power"
id: switch1
pin: GPIO4
restore_mode: RESTORE_DEFAULT_ON
on_turn_on:
- output.turn_on: led1
on_turn_off:
- output.turn_off: led1
- platform: restart
name: "Restart"

binary_sensor:
- platform: status
name: "Status"
- platform: gpio
id: button1
pin:
number: GPIO14
mode: INPUT_PULLUP
inverted: true
on_press:
- switch.toggle: switch1

sensor:
- platform: wifi_signal
name: "Etekcity_01 WiFi Signal"
update_interval: 60s
# disabled_by_default: true
# entity_category: diagnostic
- platform: uptime
name: "Uptime seconds"
id: uptime_s
update_interval: 60s
# disabled_by_default: true
- platform: pulse_counter
pin: GPIO12
id: "gpio12"
name: "GPIO12 counter"
# internal: true
entity_category: diagnostic
count_mode:
rising_edge: DISABLE
falling_edge: INCREMENT
internal_filter: 13us
update_interval: 10s
on_value:
- sensor.template.publish:
id: voltage
state: !lambda 'return id(gpio12).state * 0.00623;'
- sensor.template.publish:
id: amps
state: !lambda 'return id(watts).state / id(voltage).state;'
- platform: pulse_counter
pin: GPIO13
id: "gpio13"
name: "GPIO13 counter"
# internal: true
entity_category: diagnostic
count_mode:
rising_edge: DISABLE
falling_edge: INCREMENT
internal_filter: 13us
update_interval: 10s
on_value:
- sensor.template.publish:
id: watts
state: !lambda |-
if (id(switch1).state) {
return id(gpio13).state * 0.07708;
} else {
return 0;
}
- sensor.template.publish:
id: amps
state: !lambda 'return id(watts).state / id(voltage).state;'
- platform: template
id: voltage
name: "Voltage"
unit_of_measurement: "V"
- platform: template
id: watts
name: "Watts"
unit_of_measurement: "W"
- platform: template
id: amps
unit_of_measurement: "A"
name: "Amps"
accuracy_decimals: 3

text_sensor:
- platform: wifi_info
ip_address:
name: "IP Address"
# ssid:
# name: "SSID"
- platform: template
name: "Uptime"
lambda: |-
uint32_t dur = id(uptime_s).state;
int dys = 0;
int hrs = 0;
int mnts = 0;
if (dur > 86399) {
dys = trunc(dur / 86400);
dur = dur - (dys * 86400);
}
if (dur > 3599) {
hrs = trunc(dur / 3600);
dur = dur - (hrs * 3600);
}
if (dur > 59) {
mnts = trunc(dur / 60);
dur = dur - (mnts * 60);
}
char buffer[17];
sprintf(buffer, "%ud %02uh %02um %02us", dys, hrs, mnts, dur);
return {buffer};
icon: mdi:clock-start
update_interval: 60s
# disabled_by_default: true
entity_category: diagnostic

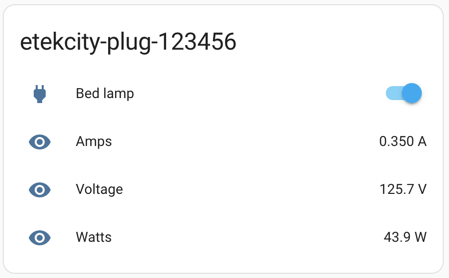
Once the device was configured, I was able to integrate it into Home Assistant, and use it to monitor the power usage of my bedroom lamp as a test.

References